说明:
php安装目录:/usr/local/php5
php.ini配置文件路径:/usr/local/php5/etc/php.ini
Nginx安装目录:/usr/local/nginx
Nginx网站根目录:/usr/local/nginx/html
安装篇
1、安装编译工具
yum install -y wget make gcc gcc-c++ zlib-devel openssl openssl-devel pcre-devel kernel keyutils patch perl
2、安装eaccelerator
cd /usr/local/src #进入软件包存放目录
wget http://acelnmp.googlecode.com/files/eaccelerator-0.9.6.1.tar.bz2 #下载
tar xjf eaccelerator-0.9.6.1.tar.bz2 #解压
cd eaccelerator-0.9.6.1 #进入安装目录
/usr/local/php5/bin/phpize #用phpize生成configure配置文件
./configure -enable-eaccelerator=shared --with-php-config=/usr/local/php5/bin/php-config #配置
make #编译
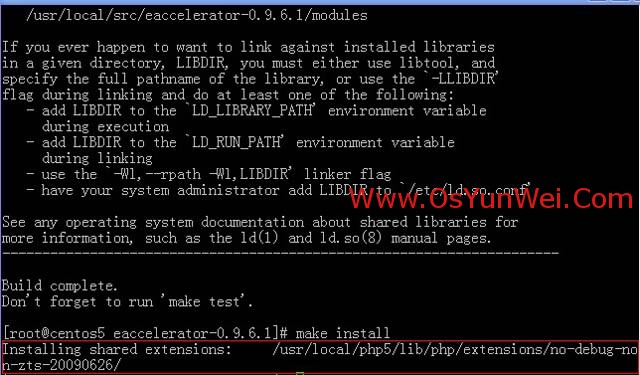
make install #安装
安装完成之后,出现下面的界面,记住以下路径,后面会用到
系统运维 www.osyunwei.com 温馨提醒:qihang01原创内容©版权所有,转载请注明出处及原文链接
/usr/local/php5/lib/php/extensions/no-debug-non-zts-20090626/ #eaccelerator模块路径
mkdir /tmp/eaccelerator #创建目录
chmod 777 /tmp/eaccelerator #设置目录权限为完全控制
3、配置php支持eaccelerator
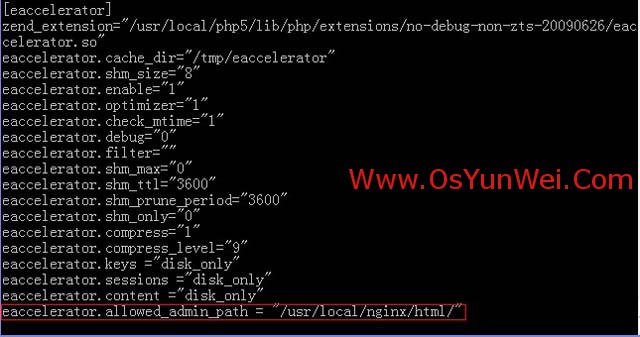
vi /usr/local/php5/etc/php.ini #编辑配置文件,在最后一行添加以下内容
[eaccelerator]
zend_extension="/usr/local/php5/lib/php/extensions/no-debug-non-zts-20090626/eaccelerator.so"
eaccelerator.cache_dir="/tmp/eaccelerator"
eaccelerator.shm_size="8"
eaccelerator.enable="1"
eaccelerator.optimizer="1"
eaccelerator.check_mtime="1"
eaccelerator.debug="0"
eaccelerator.filter=""
eaccelerator.shm_max="0"
eaccelerator.shm_ttl="3600"
eaccelerator.shm_prune_period="3600"
eaccelerator.shm_only="0"
eaccelerator.compress="1"
eaccelerator.compress_level="9"
eaccelerator.keys ="disk_only"
eaccelerator.sessions ="disk_only"
eaccelerator.content ="disk_only"
备注:如果配置文件中已经有了ZendGuardLoader等配置信息,为了避免冲突,需要把上面的配置信息写在ZendGuardLoader配置之前
系统运维 www.osyunwei.com 温馨提醒:qihang01原创内容©版权所有,转载请注明出处及原文链接
测试篇
1、vi /usr/local/nginx/html/phpinfo.php #编辑
<?php
phpinfo();
?>
:wq! #保存退出
2、cp /usr/local/src/eaccelerator-0.9.6.1/control.php /usr/local/nginx/html/ #拷贝eaccelerator配置管理文件到网站根目录
vi /usr/local/php5/etc/php.ini #编辑配置文件,在[eaccelerator]配置部分的最后一行添加以下内容
eaccelerator.allowed_admin_path = "/usr/local/nginx/html/"
:wq! #保存退出
service php-fpm restart #重启php-fpm
service nginx restart #重启nginx
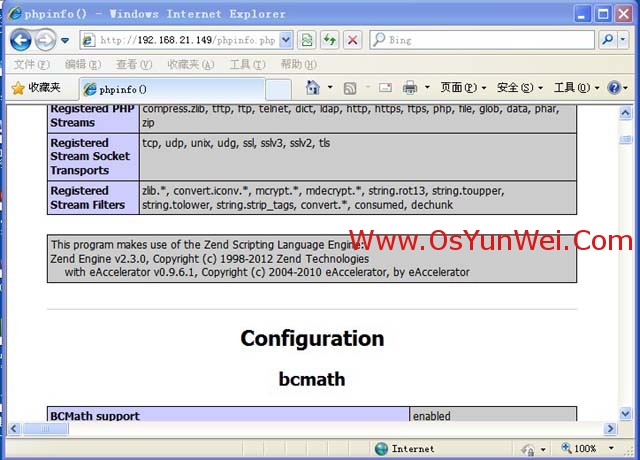
3、浏览器打开phpinfo.php 如下图所示,可以看到eaccelerator相关信息
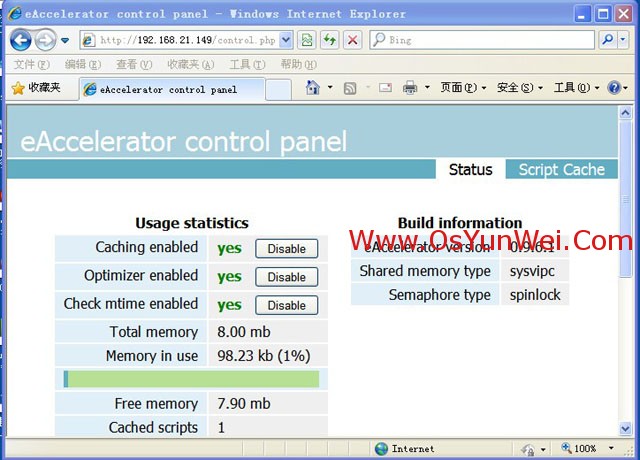
4、浏览器打开control.php 输入用户名:admin,密码:eAccelerator,可以看到下面的eaccelerator管理界面
系统运维 www.osyunwei.com 温馨提醒:qihang01原创内容©版权所有,转载请注明出处及原文链接
备注:用户名和密码可以在control.php中修改
vi /usr/local/nginx/html/control.php #编辑,找到admin部分进行修改即可
相关参数说明:
extension="/data/webserver/php/lib/php/extensions/no-debug-zts-20060613/eaccelerator.so" #PHP扩展eaccelerator.so的路径
eaccelerator.cache_dir="/tmp/eaccelerator" #缓存文件路径,即前面创建的目录
eaccelerator.shm_size="8" #eaccelerator可使用的共享内存大小(单位为MB)
eaccelerator.enable="1" #1开启eaccelerator加速,0为关闭,默认值为1
eaccelerator.optimizer="1" #1打开php代码优化,提高程序执行效率,0为关闭,默认值为1
eaccelerator.check_mtime="1" #1开启eaccelerator检查php文件是否修改,并自动重新缓存,0为关闭检查,如果php文件被修改,必须手动删除eaccelerator缓存,才能显示最新修改的php文件,默认值为1
eaccelerator.debug="0" #0关闭eaccelerator调试,禁用日志记录,1为打开,默认值为0
eaccelerator.filter="" #表示缓存所有的php文件,可以设置只缓存特定的文件,如"phpinfo.php","!phpinfo.php"表示除了phpinfo.php文件不缓存,其他的文件全部缓存,默认值为"" 即缓存全部文件
eaccelerator.shm_max="0" #eaccelerator单用户进程最大内存(单位为字节)使用限制,0为不限制
eaccelerator.shm_ttl="0" #共享内存不够时,删除在shm_ttl秒内没有被访问过的文件,默认值为"0",即不删除任何共享内存中的文件
eaccelerator.shm_prune_period="0" #共享内存不够时,删除在shm_prune_period秒内没有被访问过的文件,默认值为"0",即不删除任何共享内存中的文件
系统运维 www.osyunwei.com 温馨提醒:qihang01原创内容©版权所有,转载请注明出处及原文链接
eaccelerator.shm_only="0" #使用磁盘和共享内存来缓存文件,这个参数对会话数据和内容缓存没有效果。默认值为0
eaccelerator.compress="1" #1开启缓存文件压缩,0为关闭,默认值为1
eaccelerator.compress_level="9" #缓存文件压缩级别默认值9,即最大压缩。
eaccelerator.keys = "disk_only" #缓存文件只存放在硬盘
eaccelerator.sessions = "disk_only"
eaccelerator.content = "disk_only"
#shm_and_disk 缓存文件共享内存和硬盘(默认值);
#shm 缓存文件默认存放在共享内存,如果共享内存已满或大小超过 "eaccelerator.shm_max" 的值,就存到硬盘
#shm_only 缓存文件只存放在共享内存
#none 不缓存数据

 ②190706903
  ③203744115


不错。学习了。。