1、首先确定Apache是否加载了Mod_rewrite 模块
方法: 检查 /etc/httpd/conf/httpd.conf 中是否存在以下两段代码 (具体路径可能会有所不同,但形式基本是一样的):
(一)LoadModule rewrite_module libexec/mod_rewrite.so
(二)AddModule mod_rewrite.c
2、检查Apache是否开启.htaccess支持
vi /etc/httpd/conf/httpd.conf
AllowOverride All #如果后面参数为None需要修改为All(大概在338行)
3、在文件/etc/httpd/conf/httpd.conf相应的主机目录配置中加入如下代码(此时须注意,如果网站是通过虚拟主机来定义,请务必加到虚拟主机配置中去,否则可能无法使用。)
    RewriteEngine On
    RewriteBase /
    RewriteRule ^index\.php$ - [L]
    RewriteCond %{REQUEST_FILENAME} !-f
    RewriteCond %{REQUEST_FILENAME} !-d
    RewriteRule . /index.php [L]
系统运维 www.osyunwei.com 温馨提醒:qihang01原创内容©版权所有,转载请注明出处及原文链接
例如:
vi /etc/httpd/conf/httpd.conf #编辑
<Directory "/var/www/html">
Options Includes ExecCGI FollowSymLinks
AllowOverride All
Order allow,deny
Allow from all
<IfModule mod_rewrite.c>
RewriteEngine On
RewriteBase /
RewriteRule ^index\.php$ - [L]
RewriteCond %{REQUEST_FILENAME} !-f
RewriteCond %{REQUEST_FILENAME} !-d
RewriteRule . /index.php [L]
</IfModule>
</Directory>
4、重启Apache
/etc/init.d/httpd restart
5、设置WordPress
系统运维 www.osyunwei.com 温馨提醒:qihang01原创内容©版权所有,转载请注明出处及原文链接
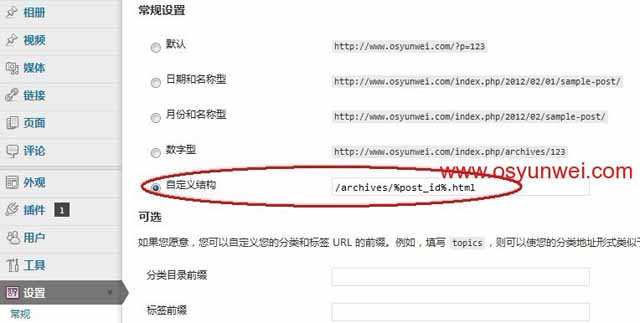
在WordPress后台-设置-固定链接-自定义结构,输入下面的代码,最后保存更改即可。
/archives/%post_id%.html

6、配置完成
前台打开页面类似于:http://www.osyunwei.com/archives/2034.html

 ②190706903
  ③203744115


