


安装说明:
VMware vSphere Client客户端是用来直接连接管理ESXI主机或者连接VMware vCenter Server的,虚拟中的创建和
管理都是要通过它来完成的!安装VMware vSphere Client需要.Net3.5 SP1以上框架支持,这里操作系统是
Windows Server 2008 R2 已经自带了.Net框架。
目前最新版本:
VMware-viclient-all-5.1.0-1064113
安装图解:
一、安装VMware vSphere Client客户端
打开安装文件,出现下面界面:


语言选择中文(简体)
确定


下一步

下一步

下一步

下一步

安装

正在安装中


安装完成
二、使用VMware vSphere Client客户端登录VMware vCenter Server
系统运维 www.osyunwei.com 温馨提醒:qihang01原创内容 版权所有,转载请注明出处及原文链接
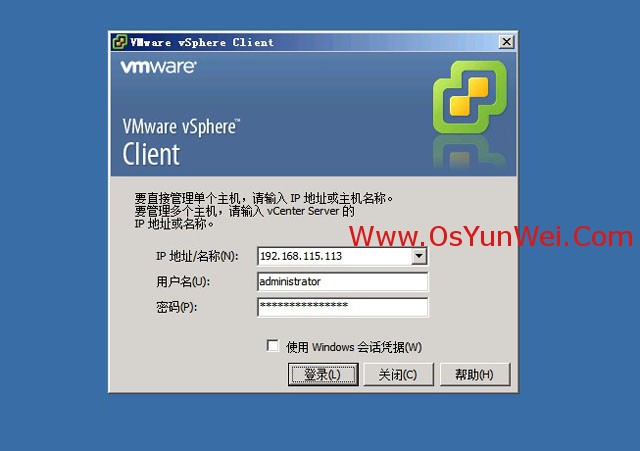
打开VMware vSphere Client登录界面
填写VMware vCenter Server服务器信息
注意:用户名、密码为VMware vCenter Server服务器操作系统的管理员账户和密码
点登录

忽略即可

登录成功!
三、在VMware vCenter Server中添加管理ESXI主机

点创建数据中心
出现下面界面:

新建数据中心-添加主机
出现下面界面:

主机:192.168.0.133 #此处为ESXI主机IP地址
填写用户名和密码
点下一步

是

下一步

系统运维 www.osyunwei.com 温馨提醒:qihang01原创内容 版权所有,转载请注明出处及原文链接
下一步

下一步

下一步

ESXI主机添加完成,如下图所示

至此,VMware vSphere Client客户端安装图解教程完成!

 ②190706903 ③203744115


楼主能否写下 ESXI vcenter 数据迁移的教程